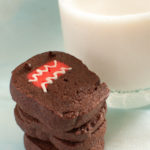
Domo-kun Cookies
Makes about 50 to 55 cookies
INGREDIENTS
- 120 grams caster sugar
- 60 grams icing sugar
- 225 grams unsalted butter, at room temperature
- 2 egg yolks
- 2 tesaspoon vanilla
- 280 grams plain flour
- 30 grams cocoa powder, Hershey's or Varlhona works beautifully
- Red food colouring, preferably paste or powder
- Decorate:
- Melted dark chocolate
- Melted white chocolate
INSTRUCTIONS
Cookie Dough
- Place the caster sugar and an icing sugar in a food processor. Process until the sugars are very fine and free of lumps. If not using a food processor, simply sift the icing sugar into a bowl and mix together with the caster sugar.
- Using a hand-held electric mixer, beat the butter at medium speed for 30 seconds. Add in the sugars in 3 batches, beating for 1 minute after each addition at medium speed and scrapping the sides occasionally.
- Add in the egg yolk, one at at time, and beat at medium speed for 30 seconds and scrapping the sides after beating. Beat in the vanilla at low speed.
- Get one clean, medium bowl - sift 80 grams of plain flour into bowl. Scoop 1/4 of the cookie batter and add it into the 80 grams of flour. Add in red food colouring (I used Wilton) and mix until you get a soft dough. Add in more food colouring if desired. Turn out the cookie dough onto a clean cling film (plastic wrap). Shape it into a rectangular block, wrap it and refrigerate it for 15 minutes, allowing the dough to harden, so that it'll be easier to handle later on.
- Sift the remaining 200 grams of plain flour and 30 grams of cocoa powder into the remaining 3/4 cookie batter. Mix until a soft dough forms. Similarly, turn the dough out onto a cling film (plastic wrap), shape into a rectangular block, wrap and chill it for 15 minutes.
Shaping
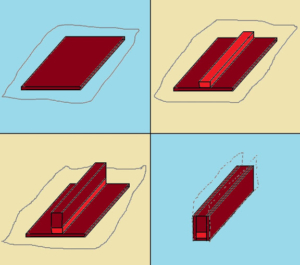
- Top left picture: To shape the dough, first place a piece of cling film (plastic wrap) on a clean table (the grey line). Take a portion of the chocolate dough and form a rectangular block, measuring 3.75 inches on the short side with a thickness (height) of 0.25 inch. The length depends on how much dough you take.
- Top right picture: Next, grab a portion of the red dough. Shape it into a rectangular block, measuring 0.75 inch on the short side with a thickness (height) of 0.5 inch. The length should be of the same length as the first chocolate dough. Trim if necessary. Place the red dough in the middle of the chocolate dough.
- Bottom left picture: Grab another portion of the chocolate dough. This time, shape it into a cuboid of 0.75 inch (meaning the short side and the thickness / height are of 0.75 inch). The length should be the same as the red dough. Trim if necessary and place it directly on top of the red dough, as shown in the picture.
- Bottom right picture: Pull the sides of the cling film (plastic wrap gently to lifft up the edges to enclose the middle blocks (I hope you understand what I mean by this...) Press gently all around the ensure the different cookie dough adheres to each other. If you realise, this is a upside-down Domo-kun. Wrap it with cling film (plastic wrap) and place it on a flat cookie sheet to ensure the cookies don't go out of shape. Place in the refrigerator and chill for at least 30 minutes.
- You may want to make several batches of Domo-kun dough (for practice purposes) and also to ensure its mouth don't go out of shape. Shape the leftover dough into whichever shape you like and wrap and chill for at least 30 minutes before baking.
Baking
- Preheat the oven to 160 degrees Celsius. Unwrap the dough and slice it to 1/8-inch thick. Place it on lined baking sheets, spacing them one inch apart. Bake for 12 to 15 minutes. The cookie will expand during baking. Cool the cookies completely.
Decorating
- Place the melted chocolates into different piping bags. Snip off a tiny end of the piping bags. Pipe the eyes and the teeth - practice makes perfect! Serve immediately or store in the refrigerator in an airtight container. It will last at least a week in the refrigerator, but I doubt they will be gone before that!
NOTES
- There will be leftover red dough from this recipe, which you can simply roll it out and cut out shapes to make red cookies.
- Adapted from Diamonds for Desserts
- Adapted from Diamonds for Desserts
Tried this recipe?Mention @foodiebaker or tag #foodiebaker!