If you are looking for a soft, spongy and porous chocolate cake, look no further! I’ve made this cake countless of times – plain, sandwiched with mousse, into swiss rolls and yule logs etc… and they had all been so, so, so good and delicious!
It is the perfect chocolate sponge cake recipe for me and I hope it becomes yours too!

And you know what? I baked this sponge cake and assembled it into something really sinful and delicious (you may have already know what it is if you’ve been following my Facebook page!)
I will be posting it up in the next 24 hours… so remember to come back and check it out! 😉
Step-By-Step Photos

Start with flour and cocoa powder – there’s no leavening in this cake at all!

Sift it once…

… twice and thrice.

Very, very airy, light and evenly distributed.

Place it back into the sieve – you’re gonna sieve it for the fourth time later on!

Four eggs in a medium pot.

Add in the sugar and whisk it immediately to prevent lumps from forming.

Whisk away!
(Note the colour of the mixture!)

Place it over medium-low heat and whisk it continuously until the mixture is warmed – like baby’s milk. It will look very frothy like this.

Transfer it into a clean, large mixing bowl and whisk it on high speed.
(Note how the colour has lightened!)

Whisk it on low for at least a minute to stabilize the air bubbles…

Until a you get a trail when you lift up the beaters – the colour of the batter is really pale and it would have tripled in volume.

Sift in half of the flour mixture.

Fold gently until almost incorporated.

Sift in the remaining flour mixture.

Fold until fully incorporated.

Melt some butter…

… And add in one-third of the cake batter.

Fold until the butter has been fully incorporated – butter sinks quick and fast when added into the batter directly, making it hard to incorporate. This method helps to lighten the butter first.
Add the butter-mixed batter back and fold gently.

Transfer the mixture into a greased and bottom-lined tin.
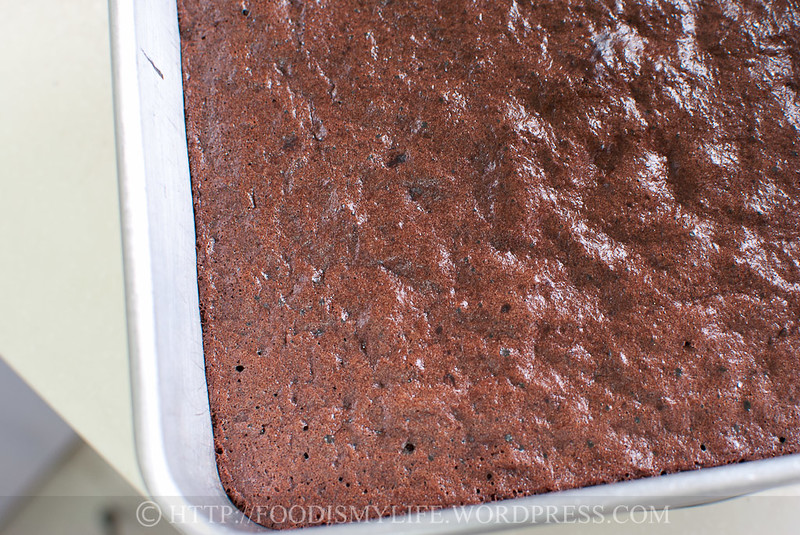
Bake away and you’ve gotten yourself a delicious genoise!
Chocolate Genoise
INGREDIENTS
- 45 grams plain flour
- 35 grams cocoa powder, use the best quality cocoa powder
- 4 eggs, cold or at room temperature
- 100 caster/granulated sugar
- 45 grams unsalted butter, melted and kept hot
INSTRUCTIONS
- Preheat the oven to 170 degrees Celsius. Grease a 7- or 8-inch baking tin and line the bottom with parchment paper. Set aside.
- Sift the flour and cocoa powder together thrice. Set aside.
- Place the eggs in a medium pot or a large metal mixing bowl. Add in the sugar and whisk immediately until combined. You must whisk the sugar immediately into the eggs otherwise lumps will form and it will be very hard to get rid of them later on.
- Hold the pot / mixing bowl over medium-low heat and whisk the egg-sugar mixture constantly, to bring up the temperature until its like baby’s milk – warm but not hot. The mixture would be foamy. You can set it directly over the heat, just make sure that you remove it from time to time so you don’t end up with cooked eggs.
- Transfer the mixture in the pot into a mixing bowl and whisk it with a hand-held electric mixer on high speed until the bubbles start to disappear. The mixture will triple in volume. Turn the mixer down to low and whisk it for at least 1 minute, to stabilize the air bubbles in the cake batter. The cake batter will leave a trail when you lift up the beaters and will sink and merge back slowly into the batter.
- Sift in half of the flour mixture and gently fold it in until almost all are combined. Sift in the remaining half of the flour mixture and fold until no flour pockets are visible. Do not over-mix.
- Add one-third of the cake batter into the hot, melted butter. Use a smaller spatula and fold the butter into the cake batter thoroughly. Pour the butter-mixed batter back into the rest of the cake batter and fold in gently.
- Transfer the cake batter into the baking tin. Tilt the tin so the batter spreads out evenly and drop it two to three times on the counter-top to burst the uneven air bubbles.
- Bake in the middle rack for 15 to 20 minutes until the cake springs back when touched gently and a skewer inserted into the centre of the cake comes out clean.
- Let the cake cool completely in the tin before decorating / frosting it.
NOTES
Tim says
Hi!
I’ve tried this recipe twice, but unfortunately both times the cake came out dense. I find that by the time I have folded all the flour and cocoa powder in till there are no pockets of dry ingredients, the batter becomes deflated. Would you have any tips on how to avoid this? I’m using this for a yule log cake!
Thanks 🙂
Jasline N. says
Hi Tim! Thanks for trying the recipe! It’s very hard for me to troubleshoot as I can’t try your genoise… but I’ll try my best 🙂
The eggs and sugar need to be warmed up and be whipped till ribbony with a whisk attachment. You can try after whipping to ribbony texture, turn down to low speed and whip for 1 minute so you incorporate small air bubbles so the genoise rise evenly.
Do you still have lumps in your dry ingredients? The dry ingredients must be well-sifted. Add them in 2 batches and use a large spatula to fold in the dry ingredients. A small spatula cannot incorporate properly and result in over-mixing.
When incorporating the butter, take a bit of the batter and mix with the butter first then fold it back to the main batter. Mixing with the butter prevents the butter from sinking immediately to the bottom, which makes it hard to incorporate fully.
Lastly, bake the genoise immediately after it is spread into a tin. As there are no leavening, the genoise must be baked asap so the air bubbles don’t escape.
The main problem I think is usually overfolding / folding technique. It’s hard for me to tell you how to fold, so the best way is to google for videos. Also, perhaps you can try other genoise recipe (sorry my site doesn’t have anymore) and see if your genoise comes out dense as well. If it is dense, then it’s probably your technique, but if the other genoise is good, then the problem may be with my recipe (which I hope it’s not because I’ve made it many times haha) and I will look into the recipe again!
Chocolate Genoise | Me Myself and Miki says
[…] http://foodismylife.wordpress.com/2012/04/27/chocolate-genoise/ […]
The Home Bakers #15: Orange Sponge Cake | Food Is My Life says
[…] them probably made that list. However, I did bake a successful sponge, a delicious and delectable chocolate genoise, but that’s it. The chocolate genoise was the only recipe that I got right, but I knew I had […]
Cuteness~ Rilakkuma Mini Cakes « Food Is My Life says
[…] bake it in a 8×8-inch tin. I chose a genoise as it’s light and delicious! Here’s the link to the step-by-step guide in making a […]
theintrepidbaker says
this is awesome!! i’m going to have to try it very soon
An Unbelievable Cake! Chocolate, Mousse, Meringue and Blackberry Curd Layered Cake « Crazed Mangoes says
[…] if you want a lighter cake, try a chocolate génoise recipe! […]
Oreo Ice Cream Chocolate Cake « Food Is My Life says
[…] cake base is my trusty chocolate genoise – it’s the perfect cake base because it is uber chocolatey (made with Varlhona cocoa […]
Chocolate, Mousse, Meringue and Blueberry Curd Layered Cake « Food Is My Life says
[…] maybe a bit too rich in my honest opinion. If I ever make this again, I would swap the cake with a chocolate genoise instead. Luckily the birthday girl is an ultimate chocolate girl and she ate it without complains […]
Jasline says
Thank you, hope you will be able to bake one soon! 😉
Jasline says
Thank you so much for the compliments! I am so glad you like it 🙂
yummychunklet says
Love your process photos. Very helpful!
apuginthekitchen says
This is a great recipe Jasline, you did a beautiful job with the instructions they are crystal clear, very well done and I will definitely be making this. I like it so much better than the chocolate sponge recipe I have always used. Thank you for posting this.
A_Boleyn says
I’m printing the revised version out so I’ll have a copy as my nephew is taking my computer home for the night (fingers crossed) to do some work on it. I’m defrosting cream cheese to make chocolate cheesecake on the weekend but I will definitely try this out.
Jasline says
Awww that’s really sweet of you. 🙂 Hope you will bake it one day!
Jasline says
Thanks for the compliment Joyce! Hope you’ll like the upcoming cake! 🙂
Jasline says
Thank you Eileen! It’s really delicious, hope you can try it one day! 🙂
Jasline says
Do wipe the drool after reading! 😉 Thank you for the compliment!
Jasline says
Thank you for the compliment Chris, hope you’ll like it! 🙂
Jasline says
Wow that’s so sweet of your mom to make it for you! My mom’s not really a baker person, but she loves this genoise with sweetened whipped cream (more than any other baked goods I’ve ever baked!)
Jasline says
Thank you John! Hope you’ll like the upcoming post and bake yourself one! 😉
Jasline says
Wow 5 years! That’s really long! I certainly hope you’ll like the upcoming cake! 🙂
Jasline says
Thank you for the compliment! 🙂
Jasline says
Hi there! I’ve updated the recipe to include cup measurements, hope you’ll be able to try it out! 😉 Good luck baking!
Jasline says
Thank you Sibella! Can’t wait to see your next bake!
Jasline says
Awww my mom loves this recipe too (though I’m the one baking for her to eat!) :p
Jasline says
I’m glad the post is useful for you Villy, hope you will bake one soon! 🙂
Bluejellybeans says
Wow! Everything looks delicious, thanks for sharing 🙂
kitchen flavours says
Wow! Looks wonderful, Jasline! I’m really curious to see your delicious creation!
eileen@hundred eighty degrees says
This looks soft and airy. I’m sure this tasted great!
Spencer says
Looks really good! I am drooling as I read your post. The sponge looks light and delicious.
Chris says
This sponge looks very light and nice. Book marking it…. thanks for sharing.
Just A Smidgen says
This one is calling me.. my mom made these when I was a little girl and I’ve got to get around to trying one! I’ll remember you’ve got the perfect recipe!!
ChgoJohn says
You had me with “chocolate” in your post’s title. Of course I’ll be here waiting for the next step. Can’t wait.
johnnysenough hepburn says
I’ve never liked any type of sponge cake as I used to wear plates (upper palette) during orthodontic treatment for five years growing up. And yet, I’m looking forward to your next post. Have always wanted a great recipe for this. And this is the one!
Choc Chip Uru says
This sponge cake looks wonderfully light and airy 😀
Can’t wait to see your creation with it!
Cheers
Choc Chip Uru
A_Boleyn says
I have been wanting to make a matcha version of the swiss roll for some time and if the recipe you posted didn’t require me to weigh my ingredients, I’d be all over it. 🙂 I think I’ll have to adapt my madeleine recipe to this and make a test batch, soon.
Sibella says
It looks wonderful Jasline! 🙂
Leslie Chapman says
My family loves chocolate and yule logs. I will have to save this recipe for my Mom.
Villy says
Very useful! I’m sure the transformation will be epic! 😀