
The exterior is perfectly golden-brown and is rich and buttery. It is so delicate and flaky that it threatens to give way any minute. The interior is sweet, caramel-y and oozing with deliciousness, with a hint of cinnamon that gives the extra kick. The exterior and interior combine to give a concoction that will make one yearn for more, licking one’s fingers to savour the goodness and will simply make one go, “Mmmmm…”
And yes, it’s an apple pie!
The thought of making a pie crust from scratch puts me off because it has always seemed so difficult and messy, but in conjunction with Aspiring Baker #10, I finally mustered enough courage to bake… a pie.
And indeed: it’s messy; it’s a little bit daunting; it’s slightly tedious; but the results are fantastic, and it was much more manageable than I had previously thought.
Which is obviously a good thing! Because besides baking an apple pie, I had ventured further and baked some juicy-licious blueberry tarts and oh-so-ever-awesome Nutella tarts. Will share the recipes soon!
So, without further ado, the baking process (:
Step-by-Step Photos

Start off with some plain flour and salt. Put it in a large mixing bowl. And by large, it means really large. Makes it easier for you to blend everything together without spilling flour all over.
The bowl you see here is not big enough at all (because in the later pictures, you will realize I’ve transferred the mixture to an even bigger mixing bowl… hehe.)

Cut up some extremely cold, best-quality unsalted butter into small cubes and add it into the flour. What I did is cut up the butter the night before and refrigerate the cubes until the next day.
The best butter should be use to ensure you have a rich and buttery crust. (:

Using a fork or pastry blender, cut the butter into the flour. A pastry blender makes life easier, but I only have a fork, so I used the back of the fork to press the butter into the flour. The aim is to cut the butter into even small pieces and mix it together with the flour. Stir it around once in a while to ensure you incorporate all the flour.
This takes time and it is the most tedious part in the crust-making, but the results are definitely worth it. Try to work the butter into the flour as fast as possible to prevent the butter from melting.
The end result: the flour mixture should look like damp sand and has only pea-sized flour/butter mixture. Nothing bigger than that.

Mix an egg with some vinegar and ice-cold water and add it into the mixture.

Stir gently until the mixture comes together and forms a dough.

Divide the dough into 2 or 4 and refrigerate for at least 30 minutes. I divided into 4 because I’m only using 2 of them to make apple pie and the other 2 to make other tarts.

While refrigerating the pie, grab some tart eating apples.

Peel, core and slice the apples thinly. Soak them in tap water. Add in the lemon juice to prevent the apple from turning brown.

In a mixing bowl, add in brown sugar…

Sprinkle some salt…

Cinnamon and nutmeg (if using)…

Some flour…

Mix the sugar mixture up. Drain the apples well and dump all the apples inside.

Stir until all the apples are coated with the delicious mixture.
They are so yummy that I can’t help popping them into my mouth.

Prepare a parchment paper and sprinkle flour on it. I find that this way can help to prevent the dough from sticking onto the surface, and it’ll be easier to clean up afterwards too (though I still made a mess after that…).

The dough goes on top the flour…

And more flour goes on top of the dough.
Roll it out until it’s 1/8-inch thick, you can make it thicker if you want.

To make mini tarts, cut out rounds and position them into the tart pans, pressing them down using your knuckles. Patch up with the remaining dough if needed.
My dough at this stage look terribly ugly – I just can’t patch it up properly, but it’ll all be covered by apples later… so doesn’t really matter I guess!

Line the tart pans with apples – the apples will shrink and soften during baking, so do pile more apples on top! Dot with some unsalted butter.

Roll out the other piece of dough, cut out rounds and put it on top of the tart pan. Press down to seal the edges.
Make some slits to allow the steam to escape during baking.

Bake, bake and bake away!
The apple sauce will bubble and drip all over, so remember to put a baking sheet below the rack to catch all the drippings, otherwise you’ll have a heck of an oven to clean!

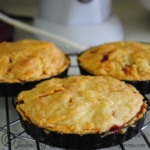
Let the pies cool on a wire rack. Serve warm or at room temperature, with or without some good quality vanilla ice cream / whipped cream.
And last but not least, I am submitting this to Aspiring Bakers #10: Easy as Pie (August 2011), hosted by Janine of Not the Kitchen Sink!

Apple Pie
INGREDIENTS
Dough
- 280 grams plain flour
- 1/8 teaspoon salt
- 225 grams cold good quality unsalted butter
- 1 egg
- 2 teaspoon white vinegar
- 2 tablespoon ice-cold water
Filling
- 6 green apples
- 2 teaspoons lemon juice, or juice of 1/2 lemon
- 115 grams light brown sugar
- 1 teaspoon cinnamon
- 1 pinch of salt
- 1 pinch of nutmeg, optional
- 1 tablespoon plain flour
- 15 grams unsalted butter
INSTRUCTIONS
Dough
- Combine the flour and salt in a large mixing bowl. Cut the butter into small chunks. Add the butter into the flour mixture.
- Use a pastry blender or a fork, cut the butter into the flour mixture. Alternatively, use two knives in a criss-crossing motion. Work fast and try not to let the butter melt. Blend the butter into the flour mixture until it has a consistency of damp sand, with a few pea-sized pieces of butter remaining.
- In a separate small bowl, beat the egg with the vinegar and water together with a fork or a wire whisk. Slowly pour the egg mixture over the flour, stirring the mixture with a fork until the mixture is moist. The dough should stick together and hold the form of a small ball.
- Divide the dough into 2 balls. Wrap each ball with plastic wrap and flatten it (either by hand or with a rolling pin) so it forms a flat disc that fills the corners of the plastic wrap. Chill the dough in the refrigerator for a minimum half an hour.
- At this point, you can choose to finish making the pie another day. The dough can be kept in the refrigerator for up to 3 days or frozen for 3 months.
Filling
- Peel, core and slice the apple thinly. Add the lemon juice into a bowl of water and toss the apples inside. This is to prevent the apples from browning.
- In a separate mixing bowl, combine the sugar, cinnamon, salt, nutmeg (if using) and flour together. Drain the apples well and toss the apples into the sugar mixture. Mix well and set aside.
Assembly
- Remove one dough disc from the fridge (if the dough has been chilled for a long time, soften it lightly by letting it rest at the room temperature for a couple of minutes before it's soft enough to work with).
- Place a large piece of parchment paper (or baking paper) on the table top. Sprinkle the top of the parchment paper with plain flour. Unwrap the dough (remove the plastic wrap) and place the dough on top of the flour. Sprinkle the top of the dough with more flour. Dust the rolling pin with flour and roll out the dough from the centre of the disc to the edge, until the crust is the desired thickness, which is usually about 1/8-inch (3mm) thick, and at least 1 inch wider than the pie dish. Keep dusting the rolling pin while rolling to prevent the dough from sticking on to the rolling pin.
- 9-inch pie dish: Roll the rolled out dough onto the rolling pin and position it over the pie dish. Unroll the dough and carefully press the dough into the pie dish using your knuckles (not fingernails!) If any cracks appear during the transfer, patch it up by pushing the seams back together with lightly floured fingers.
- 4.5-inch pie dish: Use a 6-inch cutter (or bigger, depending on how tall your pie dish is) and cut out rounds, transfer the cut dough into the pie dish and press it in using your knuckles.
- Roll out the second dough disc (also 1/8-inch thick) and set aside.
Baking
- Preheat the oven to 220 degrees Celsius.
- Using a fork, poke some holes in the bottom crust. Arrange the apples in the pie dish. The apples will shrink during baking, so pile the apples up high. Dot the apples with butter.
- Put the top crust on the pie, pressing down the edges to seal the pie. You can crimp the edges for a decorative effect (purely optional). Make 6 – 8 slits in the top crust to allow the steam to escape during baking.
- Place the pies in the centre rack. Place a baking sheet on the lower rack to catch all the apple sauce drippings.
- 9-inch pie: Bake for 10 minutes at 220 degrees Celsius. Lower the temperature to 175 degrees Celsius and continue to bake for 35 – 40 minutes, until the crust is golden brown and the juice is bubbling.
- 4.5-inch pie: Bake for 10 minutes at 220 degrees Celsius. Lower the temperature to 175 degrees Celsius and continue to bake for 25 – 30 minutes, until the crust is golden brown and the juice is bubbling.
- Transfer the pies to a wire rack and cool for 1 hour. Serve warm or at room temperature.
NOTES
- Use only the best-quality butter you can find for the pie crust. And cold butter is a must!
- If you like vegetable shortening in the crust, use 115 grams vegetable shortening and 115 grams of unsalted butter.
- If you have a food processor, by all means use it to make the dough! Combine the flour, salt and butter in the food processor; pulse several times until the mixture resembles damp sand. Don’t overdo it!
- Do flour the table top / counter top, dough, and the rolling pin well before rolling to prevent sticking. If the dough does stick to the table top, use a spatula / palette knife to gently ease the dough.
- Pricking the bottom crust with holes and cutting slits in the top crust helps to release steam during baking, ensuring you have a crisp and flaky crust later on.
- Store the baked pie in an air-tight container in a fridge. Reheat in a 150 degrees Celsius oven for 15 minutes when you want to eat it.
- Adapted from 500 Pies & Tarts

Happy pie-ing!
Aspiring Bakers #10: Easy as Pie (August 2011) [ROUND-UP] : Un Pastiche says
[…] Classic Apple Pie by Jasline of Food is my Life […]
Work it, own it. « EAP VN Blog says
[…] literally grind their own flour so it’s definitely not like the old days anymore. (Apple pie from scratch – Just because Thanksgiving just passed and I have a massive craving for apple pie now). […]
Jasline says
Thanks Weasleygurl! All the best with the pie contest! (:
weasleygurl says
This looks soooo good 🙂 I’m going to try it for a pie contest @ my youth group. wish me luck
Nutty Nutella Tarts « Food Is My Life says
[…] step-by-step photos of the crust-making, refer to the apple pie recipe! […]
Berry Blueberry Tarts « Food Is My Life says
[…] the same dough recipe for my apple pie, I opted to make mini tarts instead of one big tart. I made them in two sizes – 3-cm and 4-cm […]
Jasline says
Thanks Zoe! (:
Zoe says
Very nice and flaky pastry. These pies look very delicious to me.