
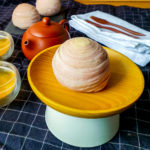
Teochew Spiral Yam Mooncake: layered and flaky pastry encasing a sweet yam / taro paste. It is pretty to look at, and extremely delicious to eat!

Teochew Mooncake / Spiral Mooncake
Teochew Mooncake is one of the many traditional varieties of mooncakes that is gaining popularity in recent years. It has a layered and flaky crust made by layering two types of dough – “water dough” and “oil dough” – together. The layering looks so impressive and pretty that sometimes it’s called Spiral Mooncake or Thousand Layer Mooncake. It also has a traditional name Lao Bing in which láo 朥 means lard and bǐng 饼 means biscuit – because traditionally, pork lard is used to make these mooncakes. Nowadays, for health and dietary reasons, many has replaced lard with shortening and/or oil.
The filling for Teochew mooncakes varies depending on preference, but yam paste / yam filling is perhaps the most common. Salted egg yolk is also sometimes added like Cantonese mooncakes. As we are not fans of salted egg yolks in mooncakes (but we like it in cream puffs), I did not include them in our yam mooncakes.

Yam Paste / Yam Filling
I think most of Singapore’s yam come from Thailand, India or China. I used 100% Thailand yam for my attempt, which costs about SGD 7 per kg from the wet market. Some recipes may also include a little purple sweet potato into the filling to make the paste more purplish in colour.
The yam is first peeled, steamed until soft then mashed and blended with sugar, oil and water. Straining the yam through a stainless steel sieve yield a smooth-textured paste. The mixture is then cooked until a paste is formed.
The sweetness of the yam paste is just right for us, it’s not as sweet as the Cantonese mooncake red bean filling.

Chinese Layered Flaky Pastry
Based on my Google research, there are generally two types of Chinese layered flaky pastry – Huaiyang-style and Cantonese-style.
Both pastries consist of an oil dough and a water dough rolled and laminated together. The difference is that Cantonese-style pastry typically consists of eggs, which likely makes it richer and yield a more crisp texture than the Huaiyang-style pastry. If I’m not wrong, the flaky egg tarts use the Cantonese-style pastry for the base.
The Huaiyang-style pastry is actually more commonly used. Besides in Teochew Mooncakes, they are also used in Cantonese Wife Cakes, Tau Sar Pia, Taiwanese Sun Cake etc.
This is my first time making the Huaiyang-style pastry and surprisingly it’s not as difficult as expected. There are plenty of YouTube resources out there which provide detailed instructions and explanation on making the pastry.
Bake or Deep-Fry
There are two methods to cook the Teochew mooncake – bake or deep-fry. I would think that deep-frying will yield a more crispy crust. As I find deep-frying troublesome, I chose to bake the mooncakes instead.

Conclusion
Overall, I’m very happy with how the Teochew mooncake turned out. The filling is not too sweet and the pastry is not as difficult as I thought it would be. The mooncake looks so pretty and tastes so delicious! I’m also excited to try other flaky dough recipes in future.
I did not take step-by-step photos of the process this time round, but I’ve included the YouTube video links in the recipes below that I referred to when making the Teochew mooncake. They have been very useful and I definitely will update the post with my own in future. Happy baking!
2024 Update
This is my 3rd year baking the mooncakes and I’ve made some tweaks in the recipe:
- Scaled down the size of the mooncake from 85-90 grams to 65 grams so it’s a more friendly size for consumption.
- Added pandan leaves when steaming the yam for extra fragrance.
- Used shallot oil instead of peanut oil – I really liked this change, the filling is much more fragrant, but not overpowered by shallot flavour.
- Resting the mooncake dough overnight – allowing the water dough to develop and relax the gluten, which makes rolling, wrapping and shaping easier.
- Reduced baking temperature and baked for a longer time as my filling tend to “explode” out of the dough.
- Added instructions to freezing and baking frozen mooncakes – nothing beats freshly baked mooncakes!
Yam Paste / Yam Filling for Mooncakes
EQUIPMENT
- Steamer
- Non-stick pan
INGREDIENTS
- 500 grams peeled yam, cut into finger-thick slices / cubes
- 2 blades pandan leaves
- 150 grams sugar
- 80 grams shallot oil, peanut oil works if shallot oil is unavilable
- 150 grams water, Part 1
- 30 grams wheat starch
- 30 grams water, Part 2
INSTRUCTIONS
- Combine yam and pandan leaves in a steamer and steam over medium heat for 20 to 25 minutes, until yam is soft and a chopstick can poke through the yam easily. Discard the pandan leaves.500 grams peeled yam, 2 blades pandan leaves
- Transfer yam into a mixing bowl and add in sugar. Mash yam while it's still hot. Stir in half of the shallot oil. Blend the yam until very smooth (I used an immersion blender), adding as much Part 1 water as needed if the paste is very thick and stiff.150 grams sugar, 150 grams water, 80 grams shallot oil
- Strain the yam paste into a non-stick pan. Stir in remaining shallot oil. Dissolve wheat starch into Part 2 water and stir into the yam mixture.30 grams wheat starch, 30 grams water, 80 grams shallot oil
- Cook the paste over medium heat, stirring constantly, to form a firm paste. This will take up to 15 to 30 minutes (see Note 1).
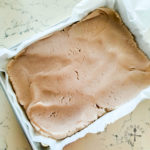
- Line a baking sheet with parchment paper. Transfer the cooked yam paste onto the lined baking sheet. Cover the surface of the paste with clingwrap to prevent a skin from forming. Let cool completely.
- The paste can be made up to 2 days in advance, keep paste frozen otherwise. Thaw the frozen paste the night before in the refrigerator before using.
- For the mooncakes, divide the paste into 35-gram portions. Roll each portion into a ball. Cover and keep chilled until needed.
NOTES
- To make shallot oil, thinly slice peeled shallots. Place shallots and neutral-flavoured oil (1:1.2 ratio by weight, i.e. 100 grams shallots to 120 grams oil) in a pot. Cook over medium-low heat, stirring occasionally. When the oil starts to foam, start stirring frequently until shallots are lightly golden. Strain before using.
- I refer to this YouTube video for the consistency of the paste.
- Recipe is adapted from Guai Shu Shu’s Teochew Yam Spiral Mooncake
Teochew Spiral Yam Mooncake
INGREDIENTS
Oil Dough
- 180 grams plain flour
- ⅛ tsp salt
- 100 grams shortening
Water Dough
- 200 grams plain flour
- 7.5 grams purple sweet potato powder, optional
- 25 grams caster sugar
- 50 grams shallot oil, lard or peanut oil can be used instead
- 100 grams water
- ½ tsp vinegar
Filling
- 720 grams yam filling, divide into 20 portions, about 35-grams each
INSTRUCTIONS
The Day Before – Oil Dough
- Sift flour and salt into a mixing bowl. Whisk to mix the salt evenly throughout the flour. Add in shortening and mix into a dough – I start off by using a firm spatula / wooden spoon, then finish mixing by hand. Wrap dough with clingwrap and chill overnight.180 grams plain flour, ⅛ tsp salt, 100 grams shortening
The Day Before – Water Dough
- Sift flour and sweet potato powder (if using) into a mixing bowl. Add in caster sugar and whisk to mix the dry ingredients. Add in oil, water and vinegar. Mix with a firm spatula / wooden spoon until the mixture starts to form a dough, then finish mixing by hand. Wrap dough with clingwrap and chill overnight. This allows gluten formation and reduce the need to knead the dough by hand200 grams plain flour, 7.5 grams purple sweet potato powder, 25 grams caster sugar, 50 grams shallot oil, 100 grams water, ½ tsp vinegar
Combining the Doughs – see Note 2
- Take out the oil and water dough from the refrigerator and let them come to room temperature.
- Weigh your water dough. Divide water dough into 10 equal portions by weight. Roll each portion into a ball. Set aside, covered with clingwrap.
- Weigh your oil dough. Divide oil dough into 10 equal portions by weight. Roll each portion into a ball. Set aside, covered with clingwrap.
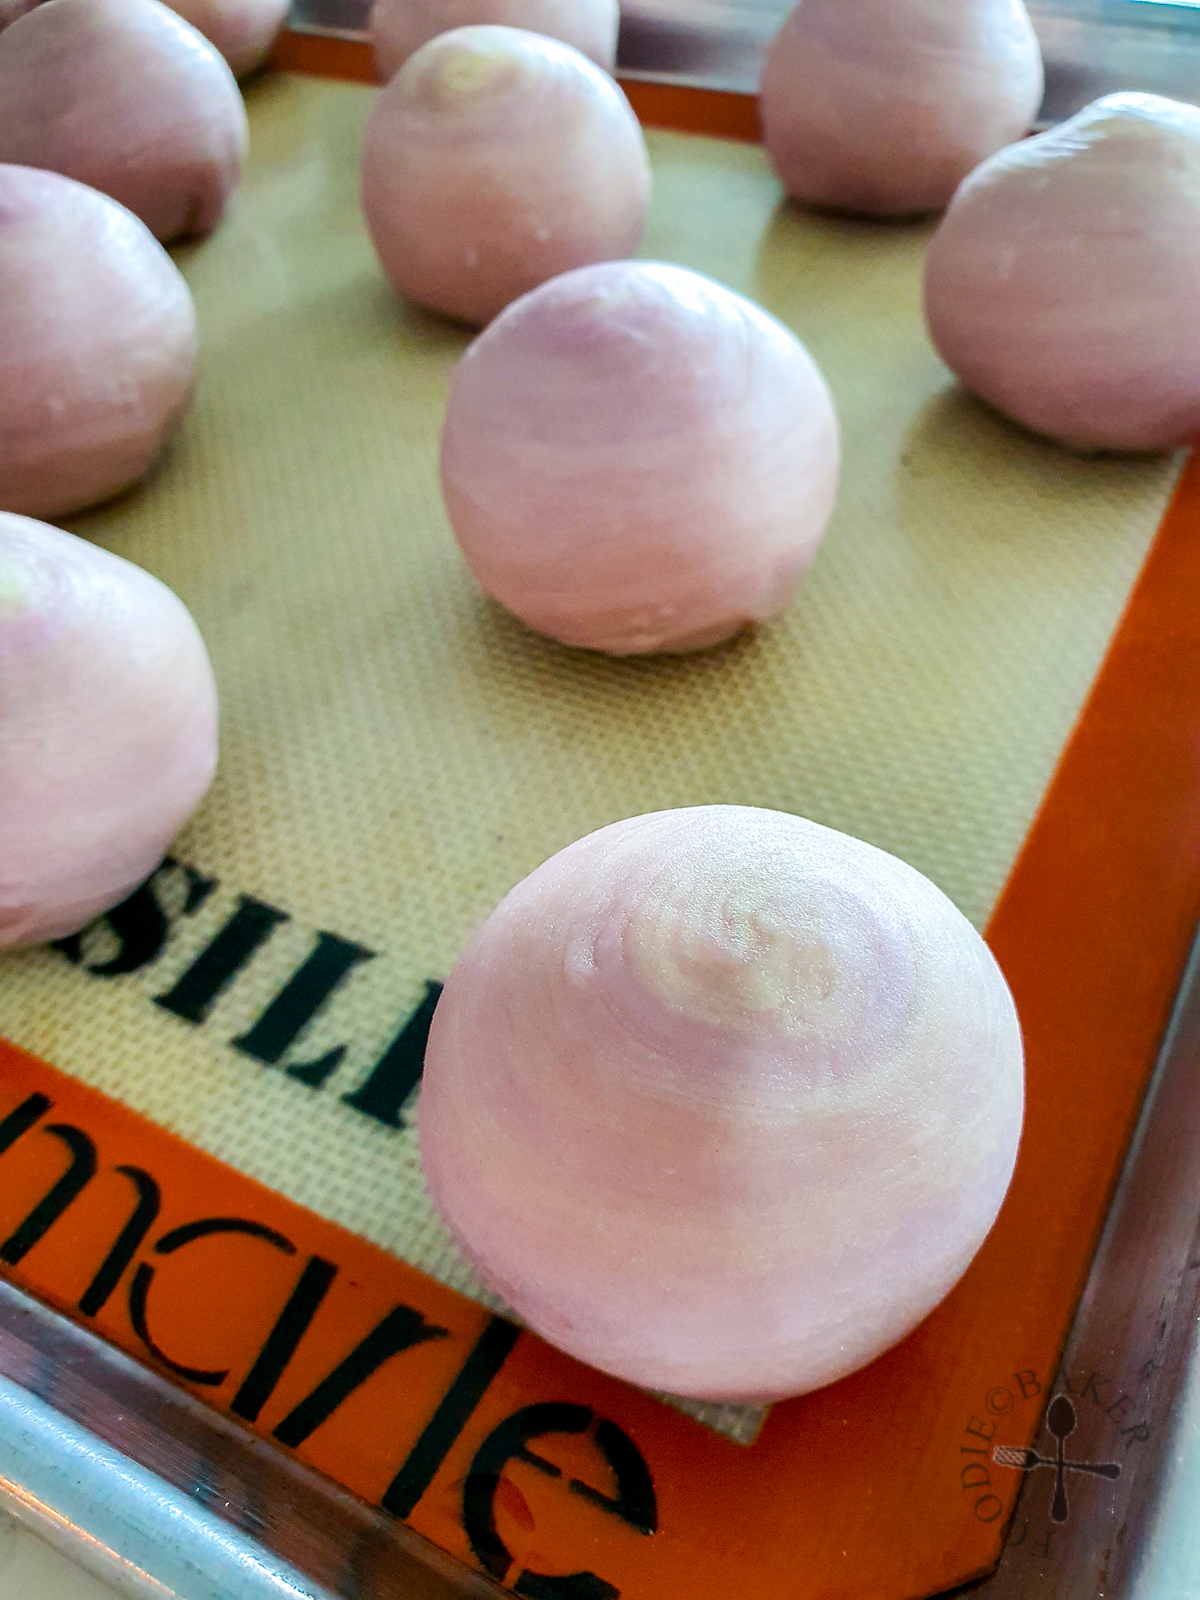
- Take the first water dough portion, flatten with your palm into a disc and encase the first oil dough portion, ensuring the water dough is evenly wrapped around the oil dough. Set aside to rest, covered with clingwrap. Repeat until all oil dough portions are wrapped with water dough portions.
- First Roll. Take the first dough portion and flatten with your palm into a disc. Take a rolling pin and roll it out gently into a long rectangular shape, about 3-mm thick. Do it gently so that the oil dough doesn't get squeezed out. Roll up the dough from the long-side tightly. Set aside to rest, covered with clingwrap. Repeat until you have 10 rolled-up logs.
- Second Roll. Take the first rolled-up log and place it seam-side up. Flatten the log with your palm and roll it out again gently lengthwise into a long rectangular strip, about 3-mm thick. Try to ensure that the dough has straight edges and is of even thickness so that it rolls up evenly. Starting from the short side, roll up the dough tightly into a roll. Set aside to rest, covered with clingwrap. Repeat with the remaining rolled-up logs.
- Take 1 rolled-up dough and use a very sharp knife to cut the dough into half. Repeat for all the rolled-up doughs (you will get 20 dough portions).
Wrapping the Mooncake – see Note 3
- Line a baking sheet with parchment paper or silpat.
- Take the first dough portion and place it cut-side up. Flatten with your palm into a disc. Flip the dough and roll gently from the centre outwards into a 7 to 8-cm circle – the dough should stay round and the centre stays centered. Roll the edges slightly so that the edges are thinner than the centre of the dough.
- Place 1 filling portion in the center of the dough – the cut-side of the dough should be facing outside. Encase the filling with the dough, keeping it as round as possible without distorting the layers. Pinch the bottom to seal. Shape the mooncake slightly so that they are round.720 grams yam filling
Freezing
- The unbaked mooncakes can be frozen for 2 to 3 months if properly stored. Place them on a lined baking sheet, ensuring that they are not touching each other. Freeze overnight until completely solid, then transfer to a vacuum seal bag.
Baking
- Unfrozen mooncakes: Preheat oven to 150°C (conventional) / 140°C (convectional). Place the mooncakes on a lined baking sheet, spacing them 2 inches apart from one another. Bake 30 minutes until cooked through (if the mooncakes are browning, tent it with aluminum foil.) Let mooncakes cool on the hot baking sheet for 15 minutes, then transfer to another baking sheet to cool completely.
- Frozen mooncakes: Preheat oven to 150°C (conventional) / 140°C (convectional). Place the frozen mooncakes (no need to thaw) on a lined baking sheet, spacing them 2 inches apart from one another. Bake 25 minutes, then reduce temperature to 140°C (conventional) / 130°C (convectional) and bake for another 15 minutes until cooked through (tent with aluminum foil if needed). Cool as above.
Storage
- The baked mooncakes can be stored in an airtight container at room temperature for 2 to 3 days. Toast the mooncakes in the oven or air fryer before consuming.
NOTES
- Always keep dough that are resting or you are not working on covered with a clingwrap to prevent drying out. I like working on a silpat so that I don’t have to use additional flour when rolling out the dough. You can also place a clingwrap (or plastic guitar sheet) on top of the dough when rolling to prevent sticking.
- I referred to this YouTube video on how to combine and roll out the dough.
- I referred to this YouTube video on how to seal the dough.
- Recipe is adapted from Guai Shu Shu’s Teochew Yam Spiral Mooncake
What are you thinking?