
I’m gonna share a recipe about these really wicked chocolate squares that I made last week.
They are really simple to make – no baking is involved! And the amount of ingredients required is minimal – only 5!

Begin with 300 grams of digestive biscuits.

Crush them using a hammer/mallet/or whatever thing you have.

Keep on crushing… and crushing…

Until you got really frustrated and decided to put them in a ziploc bag and bash them up with a rolling pin.

You’ll want your digestive biscuits to be crushed… but not too crushed…

Line a 9 x 9 inch shallow tin with aluminum foil (this is the only 9 x 9 inch tin I have)

Grab some unsalted butter (preferably softened)

Place the butter in a pot and add in 3 tablespoons of maple syrup / golden syrup or any syrup that you have

And 50 grams of cocoa powder (you can sift it if you want, but I’m just too lazy)

Melt them over very low heat, until evenly combined.

Add the melted chocolate-butter-syrup mixture into the biscuits and stir.

Stir until all the biscuits are coated with the buttery goodness.

Transfer the mixture into the tin – I couldn’t help but stole some to snack – yummmmm.

Using the back of a spoon, press the mixture into the tin.

Let it cool to room temperature and then chill for 30 minutes

Grab 300 grams of white chocolate and melt them.
I would prefer the squares with semi-sweet or plain chocolate, but I only have white chocolate at home…

While the white chocolate is melting, poke some holes around the mixture using a skewer or toothpick.

Pour the white chocolate over the mixture..

And pour…

Spread the white chocolate evenly over the mixture and refrigerate till set.

Before serving, take the tin out and let it sit at room temperature for ten minutes for the chocolate to soften – so that it’ll be easier to cut.

Lift up the chocolate slices using the aluminum foil.

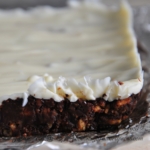
Peel the aluminum foil away and reveal the holy goodness.

Slice it up – makes about 16-20 squares.

Place on a serving plate…

And serve. Yum.
Wicked Chocolate Squares
INGREDIENTS
- 300 grams digestive biscuits
- 225 grams unsalted butter, softened
- 3 tablespoons golden syrup / maple syrup
- 50 grams cocoa powder
- 300 grams white/plain/semi-sweet chocolate
INSTRUCTIONS
- Line a 9×9-inch tin with aluminum foil and set aside. Crush the digestive biscuits – but not too finely – and place in a heatproof bowl.
- Combine unsalted butter, golden/maple syrup and cocoa powder in a pot and heat over very low heat, stirring constantly with a spatula/wooden spoon until butter is melted and cocoa powder has dissolved.
- Pour the butter-syrup-cocoa mixture into the bowl of crushed digestive biscuits and stir until the biscuit pieces are well coated in the butter-syrup-cocoa mixture.
- Spoon the mixture into prepared tin, pressing it down with the back of a spoon. Allow to cool then refrigerate for 30 minutes.
- Place the chocolate in a heatproof bowl. Set the bowl of a pot of simmering water – do not let the water touch the bottom of the bowl. When almost all the chocolate has melted, remove the bowl from the pot and stir to melt the remaining chocolate. Let the chocolate cool slightly.
- Poke some holes in the biscuit base and pour the melted chocolate over it, smoothing it out with a palette knife or the back of a spoon. Refrigerate until ready to serve.
- Before serving, take it out of the fridge and let it rest for 10 minutes for the chocolate to soften. Lift up the biscuit block using the aluminum foil, and peel the aluminum foil away. Cut the biscuit block into 16 or 20 squares. Indulge and enjoy.
NOTES
- Adapted from Good Housekeeping – CHOCOLATE by Collins and Brown
Jasline says
Hello passer, I’m sorry I can’t think of any substitute… Maybe you can try substituting the plain digestives with the chocolate cream ones or loackers or oreos. I think the chocolate/cream in these biscuits will help a bit in binding the mixture together. So sorry couldn’t think of anything!
passer says
hello! any substitute for the butter? cause i think its way too much butter and really fattening. i want a milker taste. maybe changing the butter and putting homemade custard instead will it work? im afraid it will not stick. any suggestions instead of using butter?
Jasline says
Hi Choc Chip Uru! (: I love the biscuits and chocolate combination. I’m happy that you stop by too! Have a great week ahead (:
Choc Chip Uru says
What a simple but effective recipe – certainly gets my blood pumping seeing all that delicious chocolatey goodness 😀
Happy to be on your blog!
Cheers
Choc Chip Uru
Latest: Healthiest Natural Sugars Muesli Bars
DG says
This looks easy and delicious. Love it!
mypeaceofheaven says
This looks lovely! 🙂 Is the outcome very sweet?
Hi! Thanks for your comment! (: The base is not very sweet, but the white chocolate on top sure is! So I think they complement one another, but my friends want me to use semi-sweet or plain chocolate the next time, because they’re not huge fans of white chocolate. (:
Cheers,
Jasline