I love coconut – from the juice to the flesh to the dessicated ones to the cream! I also love coconut in curries (from red to green to yellow to laksa), in rice like nasi lemak, and in desserts like kuihs, chendol, ice cream and in cakes! However, I don’t bake with them as they spoil very easily (excuses, excuses, excuses…). But with Bake-Along coming up with a Coconut Checkerboard Brownies I can procrastinate no longer!

I absolutely love the brownies base – intensely chocolatey and gooey. The coconut is a little too dry for my liking – I think the difference lies in the fact that the original recipe used fresh desiccated coconut (which is moister) while I used dried ones. Though it’s not explicitly stated in the recipe that fresh coconut should be used, I think that’s the main reason why the coconut portions are not moist enough. Nevertheless, the coconut smells extremely heavenly during baking and it’s an interesting twist to the traditional brownie.
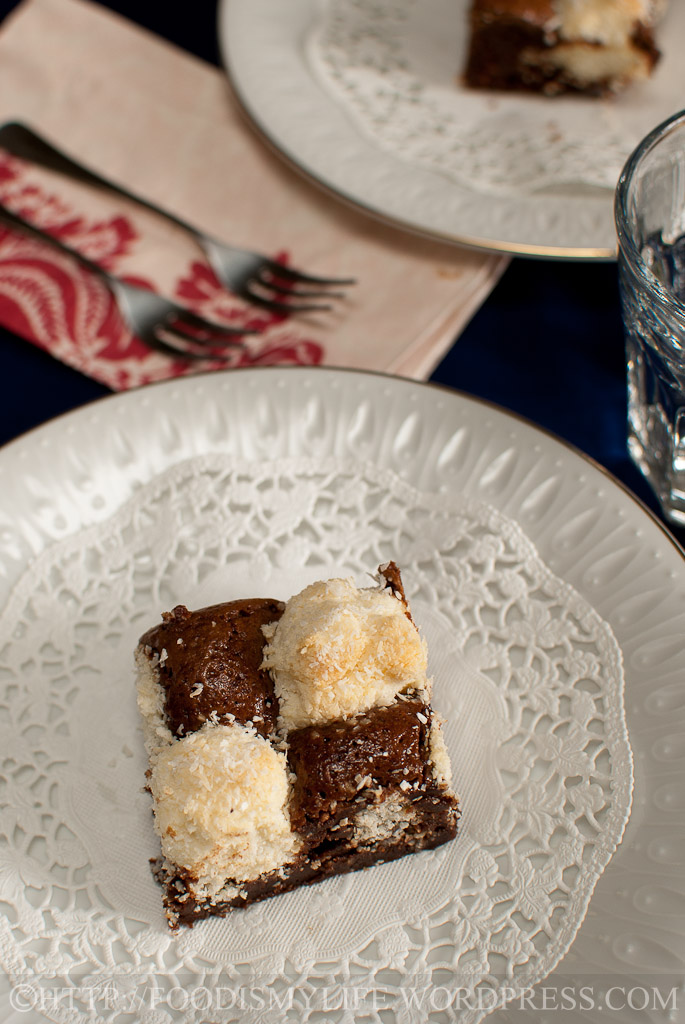
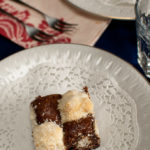
The checkerboard is definitely very lovely to look at, but it’s a little time consuming (having to refrigerate and spoon them separately), and to be honest, after cutting the brownies up, it’s hard to see the checkered pattern.
So the next time I make this, I would probably increase the amount of coconut cream and make the brownie into 3 layers – brownie, coconut and brownie again. It would be more even and easier to taste the coconut and brownie at the same time.
On to the step-by-step photos!
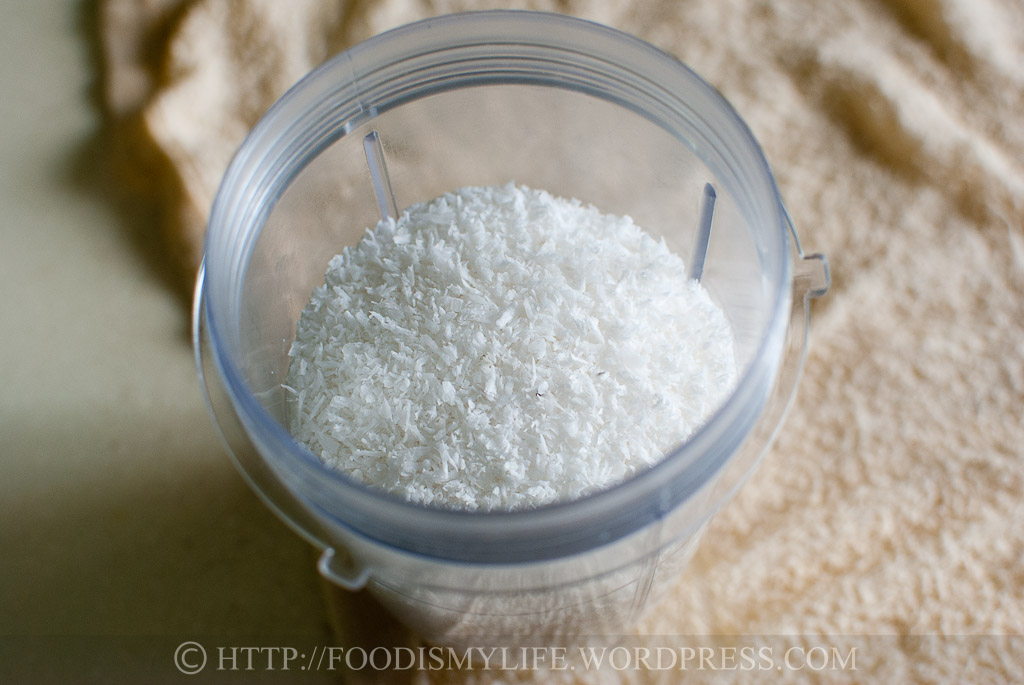
Coconut in a food processor – process till its finely chopped.
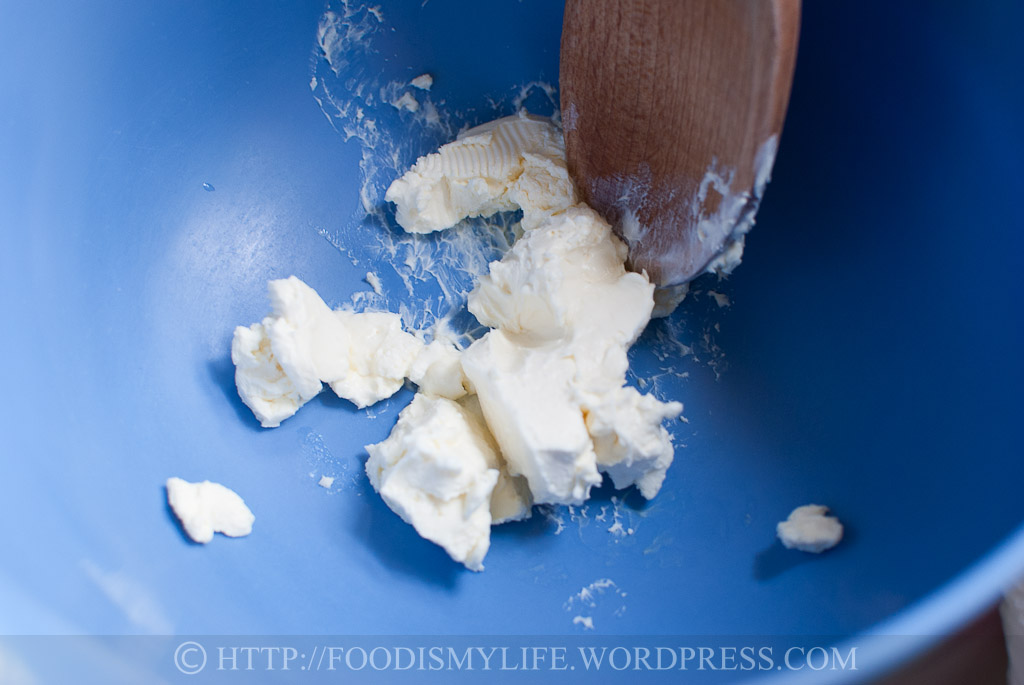
Weigh some softened cream cheese in a mixing bowl.
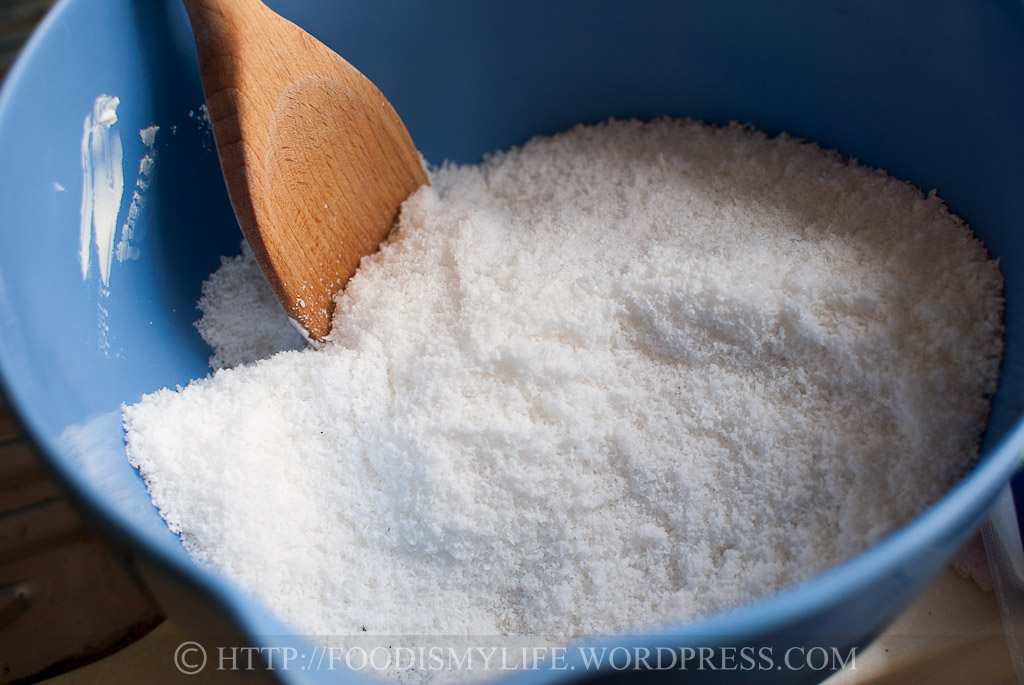
Add in the chopped coconut…
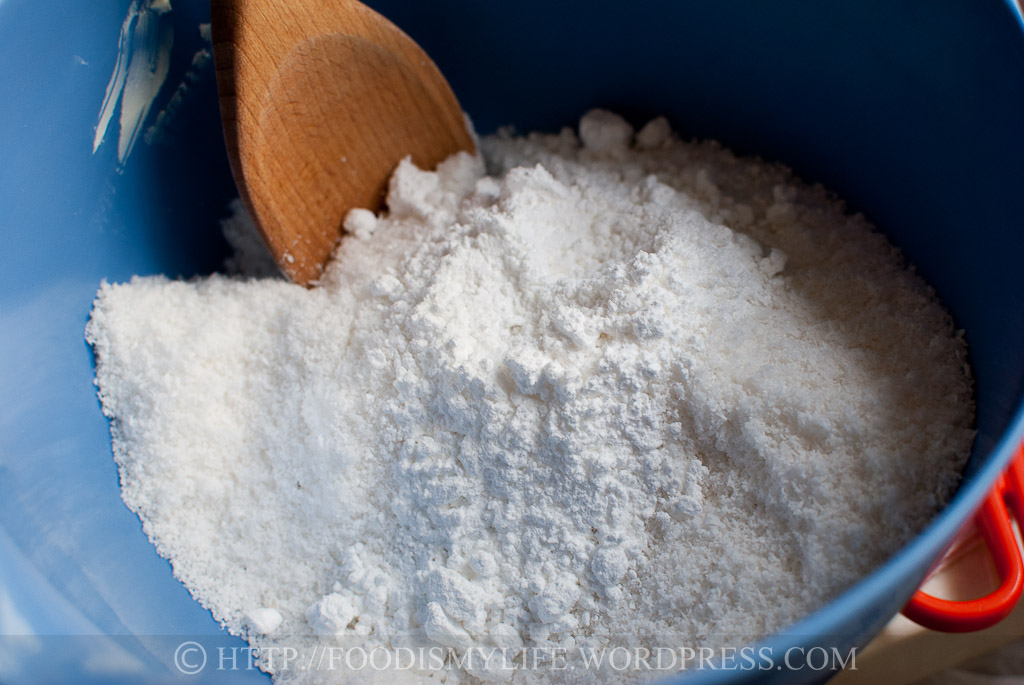
… And icing sugar.
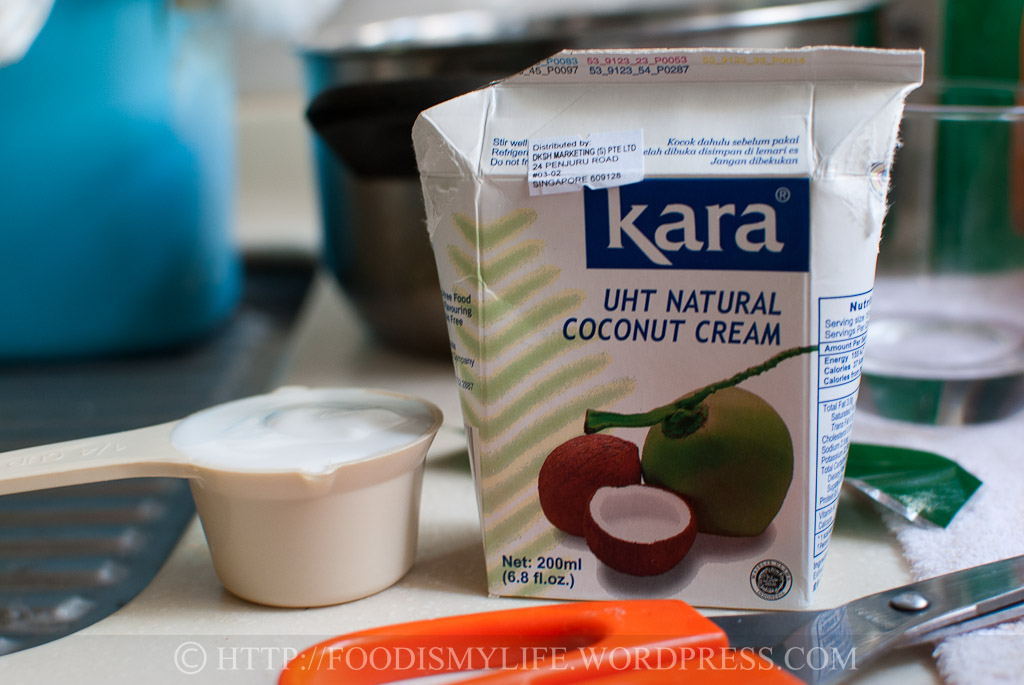
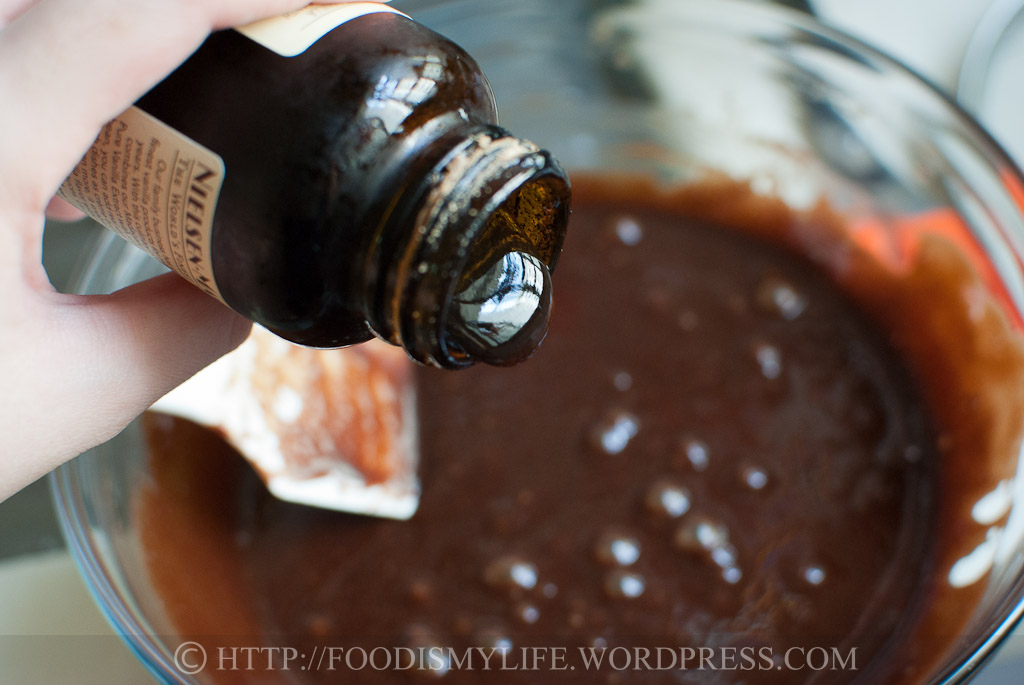
Measure some cream of coconut.

Add in the cream of coconut.
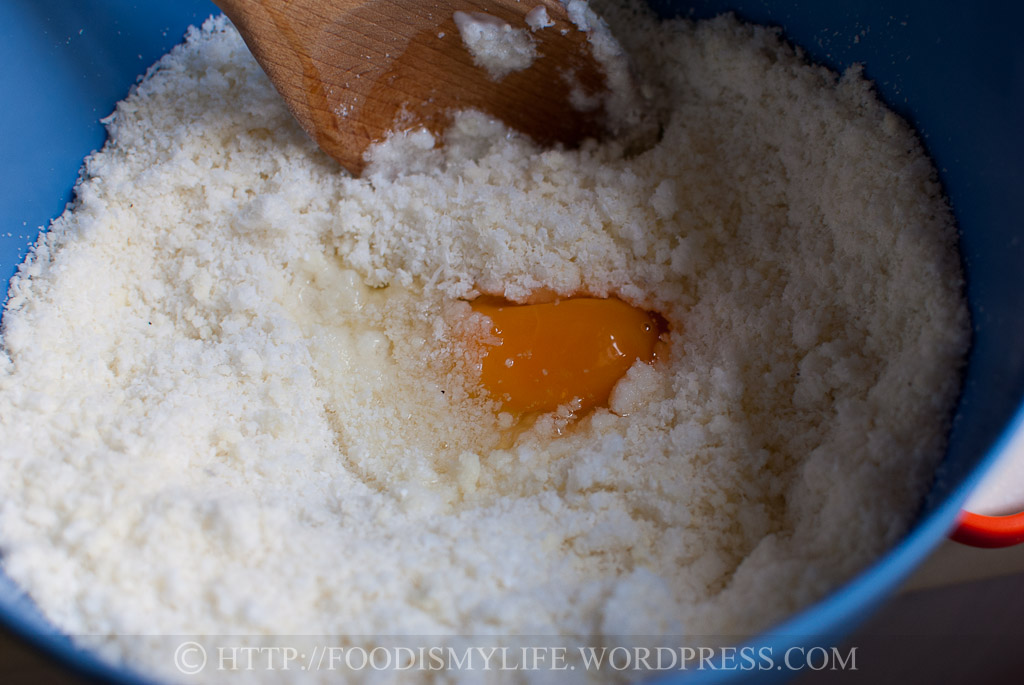
Mix it around and get one egg and a pinch of salt in.
Mix, stir and mash the mixture – I think the mixture should be moister
than this, so do add a little more cream of coconut if you have the same consistency as mine!
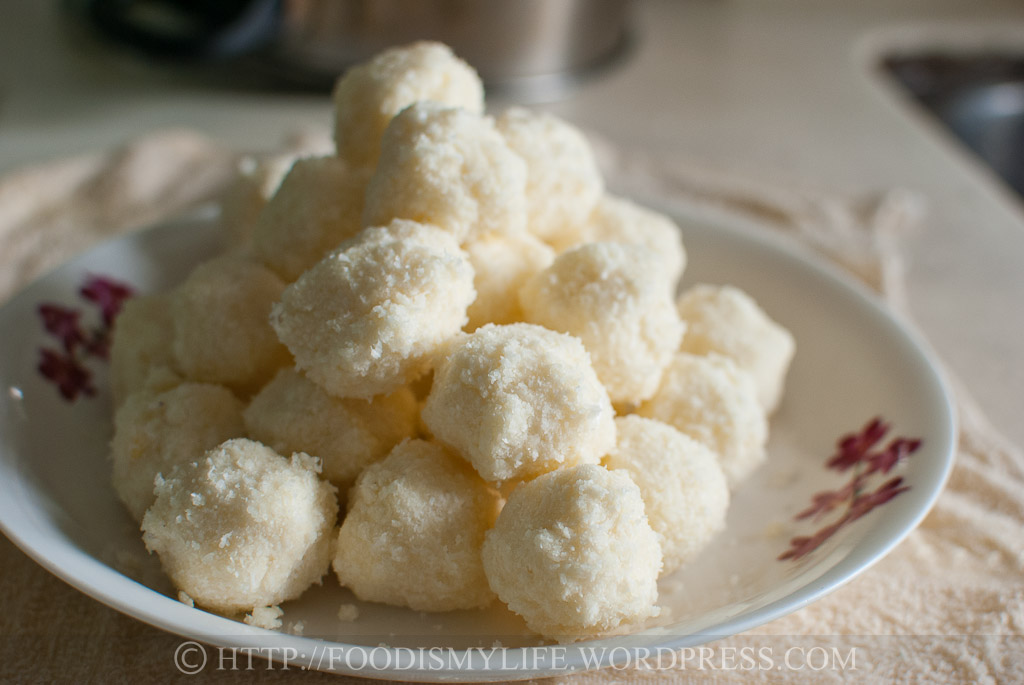
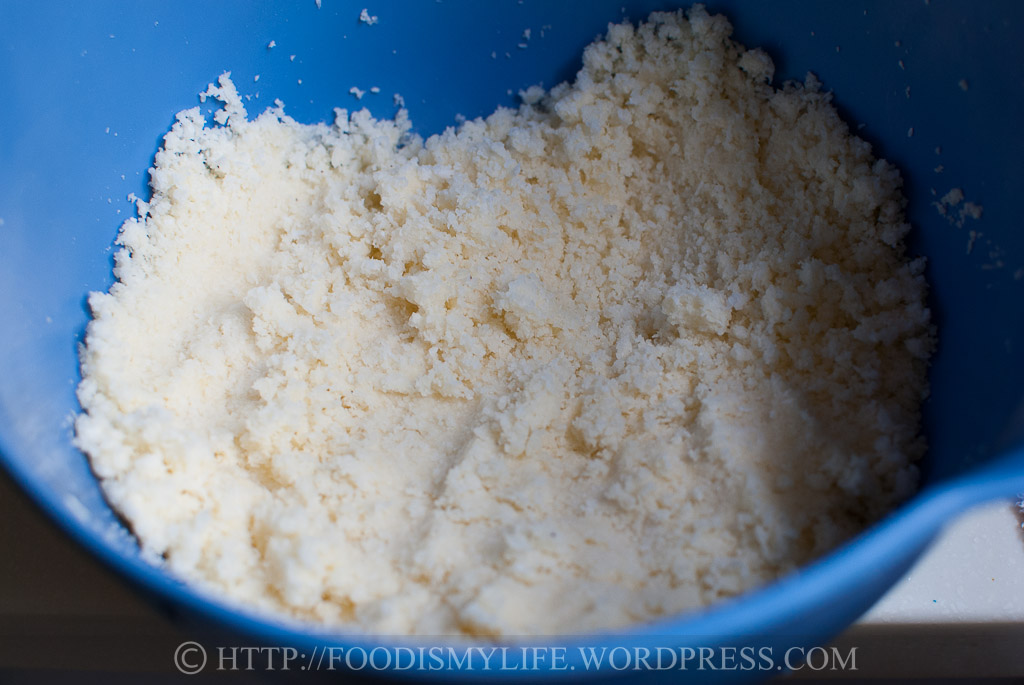
Refrigerate then roll into little balls like these.
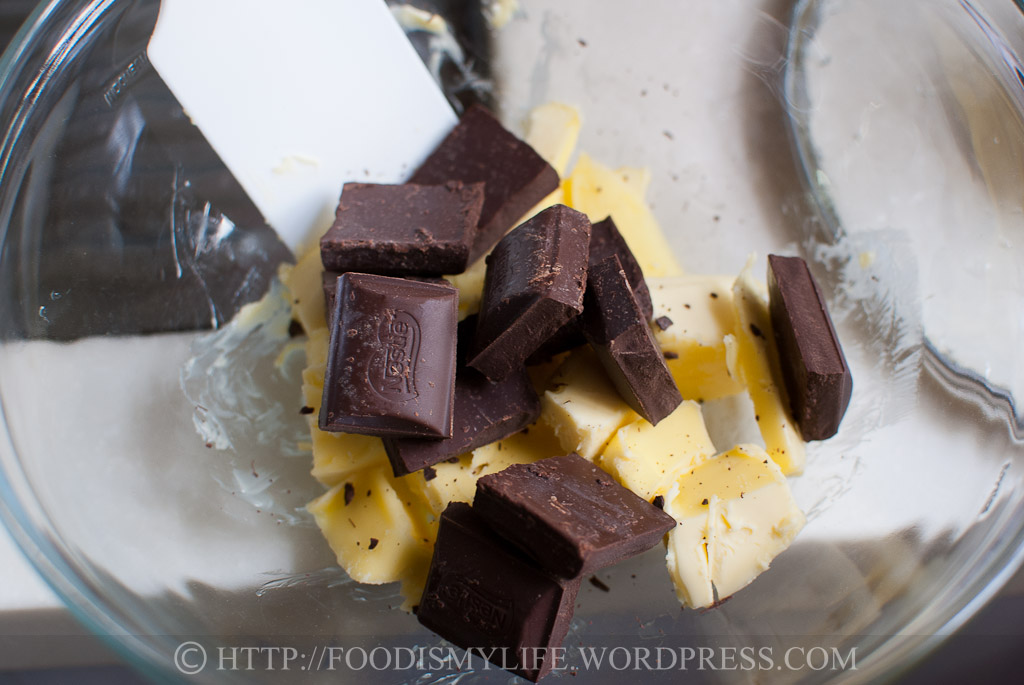
Combine some butter and chocolate in a heatproof bowl.
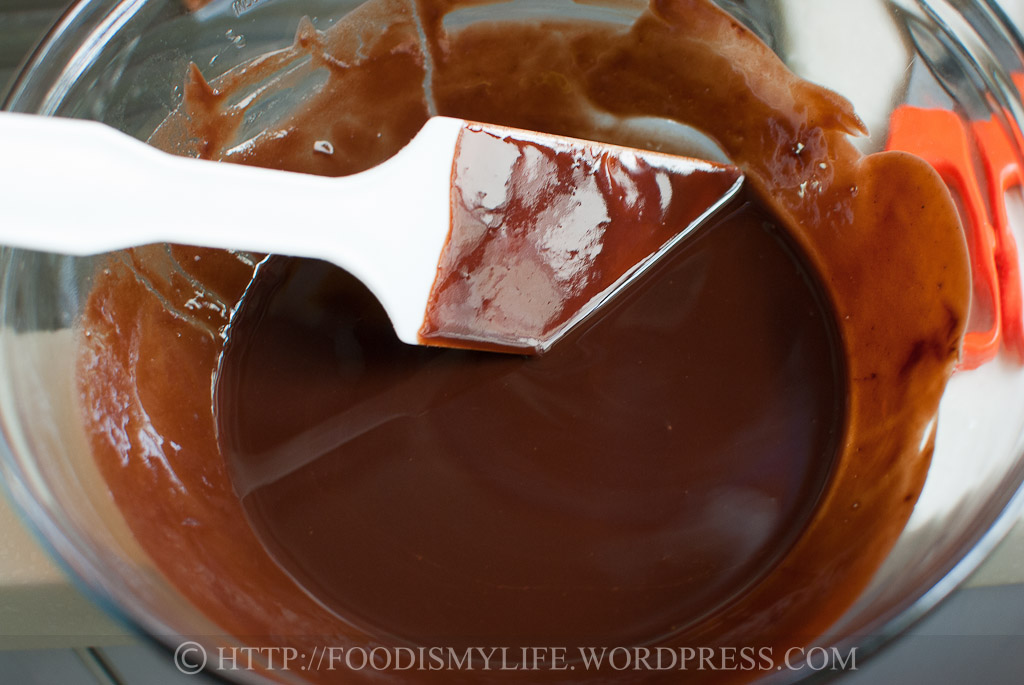
Melt into a smooth consistency over a pot of simmering water (double boiler).
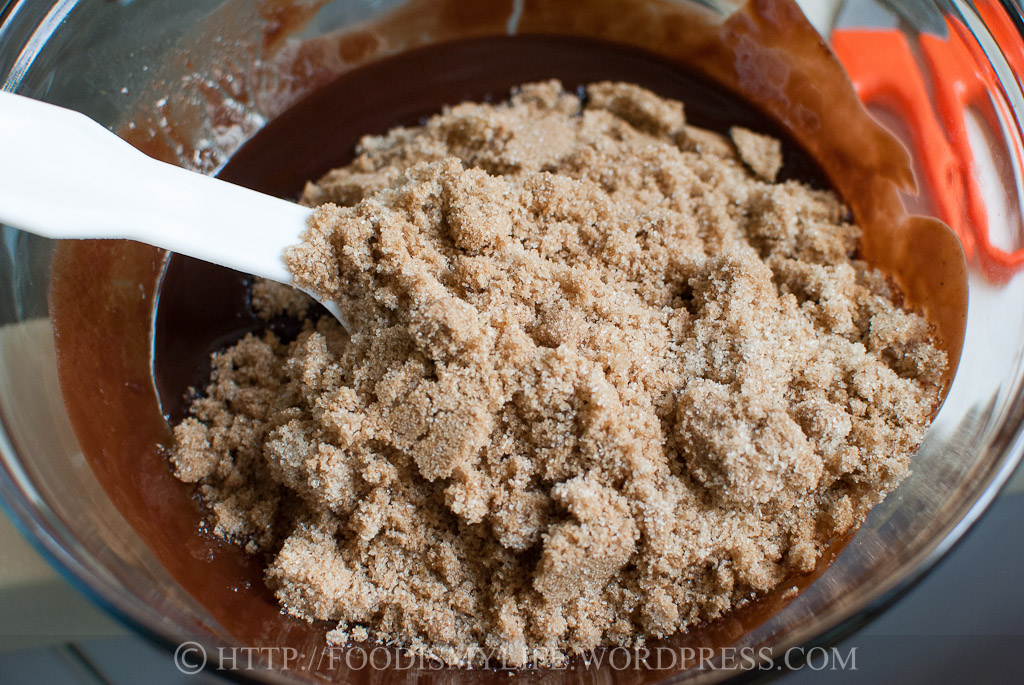
Add in sugar and stir. It will be lumpy, but will turn out ok later on (like magic!) Let the mixture cool slightly.
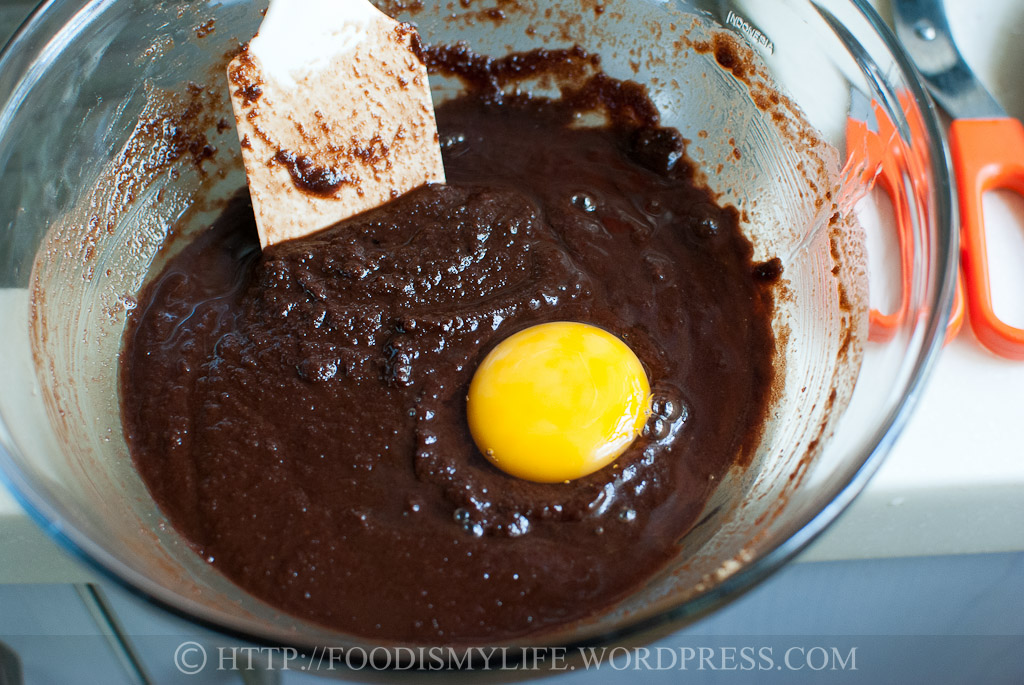
Whisk in one egg at a time until fully incorporated – I beat them in using my rubber spatula (really lazy to grab my whisk).
Add in a teaspoon of vanilla extract / paste (I always estimate as I don’t want to waste the paste on the measuring spoon!)
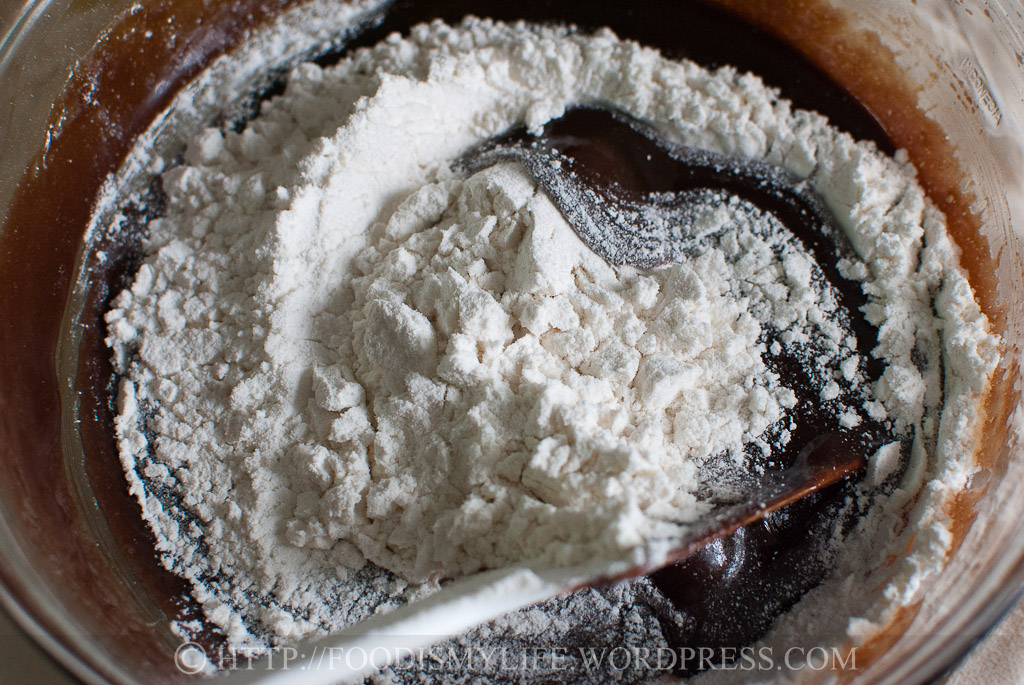
Sift flour, baking powder and salt over the chocolate mixture and fold it in.

The luscious brownie batter! Spread some brownie batter at the bottom of the brownie pan then refrigerate both the brownie in the pan and the leftover till it’s thicker, but not firm.
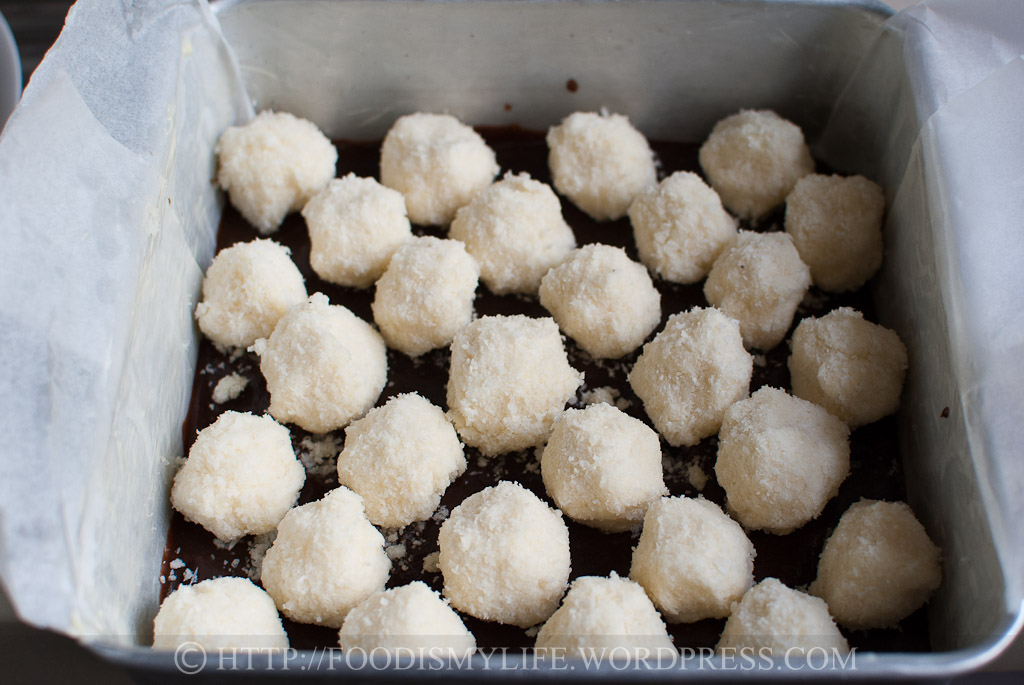
Arrange the coconut balls on the cold brownie base.
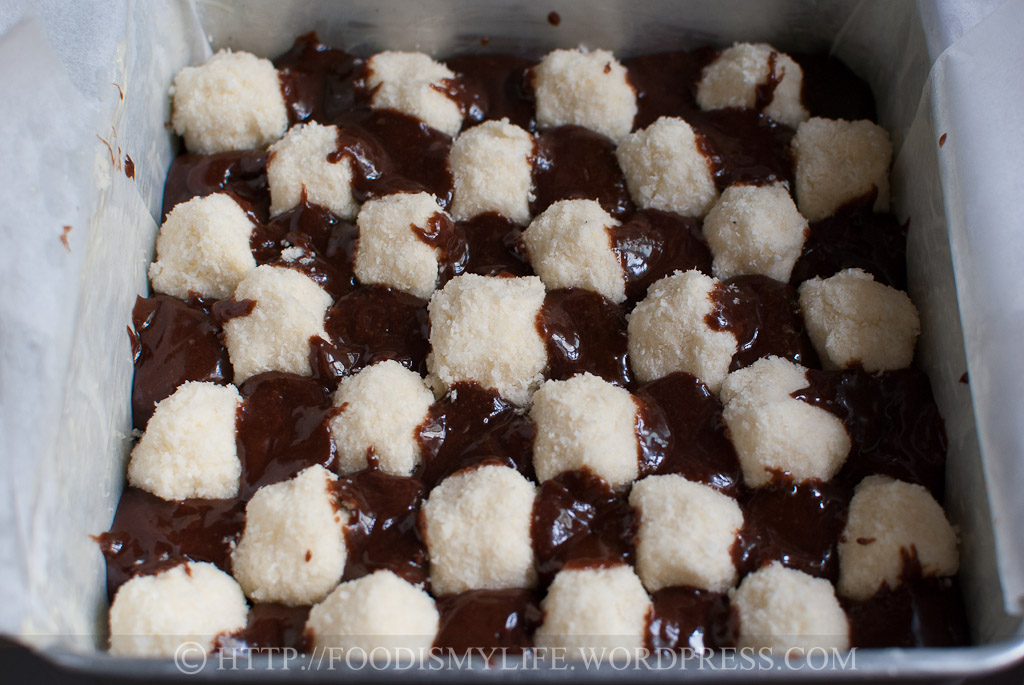
Fill the little “holes” with the cold leftover brownie.
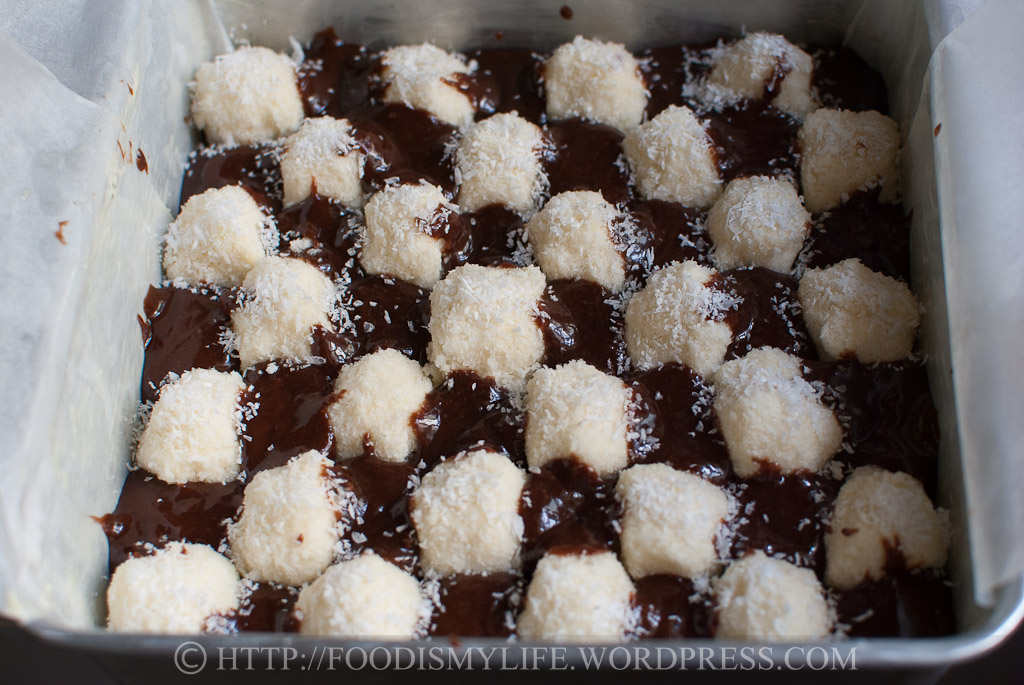
Press some coconut on top of the coconut balls (didn’t do a good job adhering them and gave up halfway!)
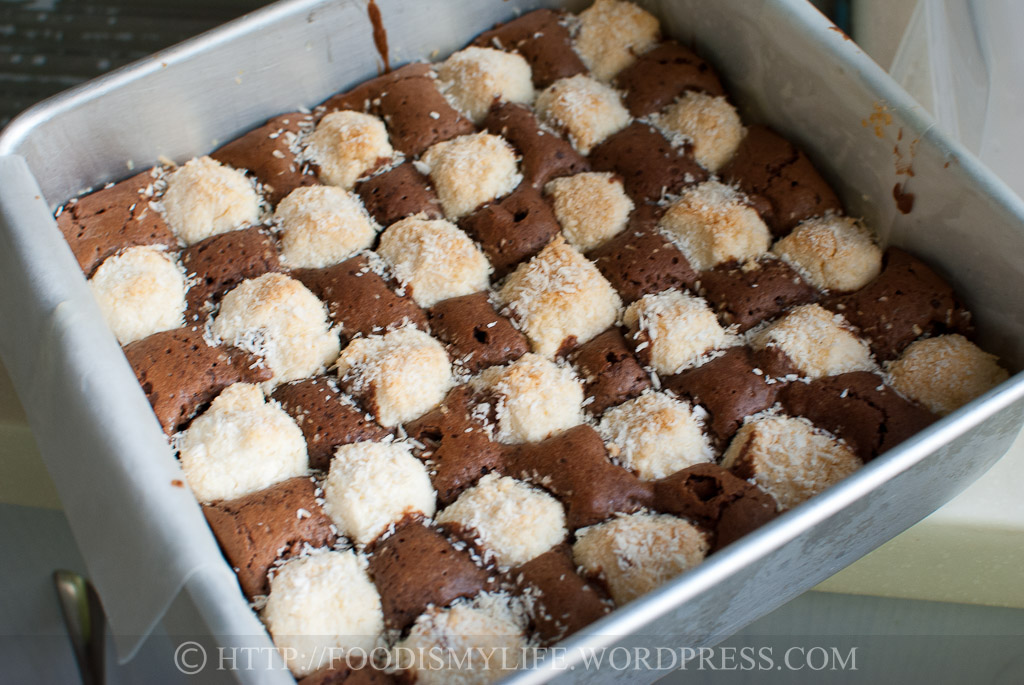
Bake until the brownie’s cooked and the top is lightly golden brown! (Sorry for the blur photo!)
Do hop over to the lovely hosts – Joyce from Kitchen Flavours, Lena from Frozen Wings and Zoe from Bake for Happy Kids – websites for their bakes for this Bake-Along! And to see what other bloggers have baked, do click the little froggie below!

Coconut Checkerboard Chocolate Brownies
INGREDIENTS
Coconut Batter
- 200 grams dessicated coconut
- 55 grams cream cheese, at room temperature
- 30 grams 1/4 cup powdered sugar
- 62.5 ml 1/4 cup cream of coconut
- 1 egg
- Pinch of salt
INSTRUCTIONS
- Butter an 8x8x2-inch metal baking pan.
Coconut Batter
- Measure 1/3 cup flaked coconut; cover and set aside.
- Place remaining coconut and sugar in processor and chop them finely.
- Place the cream cheese in a mixing bowl and add in the chopped coconut and cream of coconut. Stir, mash and mix them all up.
- Add in egg and salt and mix well. Refrigerate till firm, about 1 hour.
Chocolate Batter
- Place the butter and chocolate in a heatproof mixing bowl. Set the bowl over a small pot of simmering water (not allowing the water to touch the bottom of the bowl). Melt the chocolate and butter completely, stirring occasionally till smooth. Remove from heat and stir in the sugar all at one go. It'll be lumpy but that's ok. Let cool for 10 to 15 minutes.
- Whisk in the eggs, one at a time, until fully incorporated. Whisk in the vanilla.
- Sift in the flour, baking powder and salt over the chocolate mixture and fold it in with a large metal spoon / rubber spatula.
- Spread 1 1/4 cups of the batter on the bottom of the pan and spread it out evenly. Cover the pan with foil and refrigerate it together with the remaining batter till thickened, about 15 to 30 minutes.
Assembly
- Preheat the oven to 150 degrees Celsius. Roll the coconut batter into small balls and arrange them in a checkered pattern on the cold brownie base. Scoop the brownie mixture and fill the "holes".
- Sprinkle reserved 1/3 cup flaked coconut over coconut mounds; press gently to adhere. Cover pan tightly with foil.
- Bake for 35 minutes. Remove foil and bake until tester inserted in center of 1 chocolate mound comes out almost clean, about another 40 minutes. (Yes the baking is this long! I underbaked mine by 5 minutes, so the brownie is still pretty gooey in the middle - I love gooey brownies!)
- Cool brownies completely in pan on rack. (I kept my brownies in the refrigerator after cooling them to firm up the gooey base a little - absolutely delish!)
jothetartqueen says
ah definitely..cream cheese and chocolate brownie will taste awesome! thanks for the great idea!!
Jasline says
Thank you Jo! Hmmm why not substituting the coconut portion with cream cheese batter? I’m sure a cream cheese-chocolate checkerboard brownie would taste delicious too!
Jasline says
Thank you for the compliments Anuja! I only wish the coconut batter is softer, it would have made the brownie perfect!
jothetartqueen says
fantastic idea for a checkerboard brownie! the brownie looks absolutely gorgeous! such neat lines and cubes..I would love to make this, the only thing that is stopping me is that I’m not a huge fan of coconut especially desiccated coconut.
Alice says
thanks Jasline! Ive made only today this evening, was outside almost the whole day yesterday and today too wew…
now both batters are in the fridge, i guess i’ll only arranging and baking tomorrow, not sure if it’s fine, cos the instruction is only around 3 hours in the fridge, hope its ok, now too tired to continue LOL
we’ll see tomorrow,…
Jasline says
Hi Mich! I think we can only get fresh ones in wet markets – but they spoil very easily and dried ones from supermarkets are much easier to get… I think adding more coconut cream will help in the texture of the coconut batter. Thank you for your compliments! 🙂
Jasline says
Hi Alice! I didn’t add sugar as I felt that there’s enough sugar in the overall brownie (I even reduced the sugar for the brownie batter as I’m worried the brownie would be too sweet). Overall the brownie has just the right amount of sweetness for me. All the best in baking the brownie! 🙂
Anuja says
HI Jasline,
By far yours is the best checkerboard brownies I have seen. Dont get me wrong, others’ did great too, but I liked your perfect checkerboard pattern. Mine didnt turn out good. It was too moist and soggy. Probably coz I used fresh coconut!! I will have to try it again coz its really bugging me that i didnt get it right :D.
Have a nice day!!
Anuja
Alice says
i was confused on how to get the sweetened coconut cream and then i saw u used kara coconut cream
will i need to add the sugar since kara is not sweetened?
going to make tomorrow 🙂
Bam's Kitchen says
You have so much patience for perfection. Looks so yummy and very different with the coconut. I have to go to sleep before I have to whip up your coconut brownies to go along with Choc chip Uru’s rocky road icecream.
Chris says
Very pretty checkerboard brownies.
A_Boleyn says
It’s certainly an impressive looking dessert. 🙂
lena says
hi jasline, reading your first paragraph seems to be describing me too!! coconut lover but strange enough, dont use that as much as in baking! YOur checkerboard brownies is perfect..a real checkerboard ..there didnt seem to be much gaps in between the white and the choc squares! i didnt find mine dry though..anyway i did a wrong conversion of the butter..maybe that’s one of the reason and i used flaked coconut. I think they are slightly different from dessicated coconut which appears to look more drier. Mine is like eating coconut candies..haha! Always a pleasure to have you joining us..i know you only bake during weekends! so thanks!
Villy says
Oh, Jasline!! It’s 17.00 here, perfect time for snack, and I so wish I had a big piece of that!!
zoetic * epics says
Very creative and fun!
Angeline says
Jasline, what shall I say here. You are just one amazing baker.. I like to see your steps of baking this checkerboard brownies…It is very pretty and neatly done.
rsmacaalay says
Wow this looks so cool! I love this idea
yan says
Beautiful, love your step by step with pictures.
Choc Chip Uru says
Checkerboard brownies? Absolutely beautiful my friend, you are amazing!
Cheers
Choc Chip Uru
ChgoJohn says
These brownies look terrific and are so very far beyond my Neanderthal-like baking skills. I guess I’ll just have to wait for the arrival of that Care package you’re preparing for me.
MiMi Bakery House says
Jas, loved yr details pics & how u had done up the brownies!! Nice yummy brownies u hv:))
yummychunklet says
Delicious looking brownies. Great process photos, too!
Mich - Piece of Cake says
Hi Jasline, I also used the dried dessicated coconut. Can we get fresh ones here in Singapore? It seems very hard to find. My coconut batter looked like yours – like cookies lol… you have a perfect checkerboard there. Beautiful.
Zoe says
Bravo Jasline! Love the perfect checkerboard pattern of the brownies! Your bake seems so perfect… Totally agree with you… I like the fresh coconut more than the dessicated ones.
Being Singaporean, my husband and I grew up eating lots of coconut too but strangely, the two of us like coconut in only in our savoury dishes and Asian desserts. Not in cakes and sweets… lucky that Joyce and Lena have agreed to allow me to transform my brownies to a non-coconut one.
kitchen flavours says
Hi Jasline, Nice brownies! I use flaked coconuts, which is not as dry as the dessicated ones, and the batter for the coconut mixture was really thick and wet, maybe because the of the moister flaked coconuts and also I use a large egg. So my brownie was really moist, both the white and choco part, and taste really good overnight, I’m enjoying one right now! 🙂
You did a very neat job of alternating the checks, and they look nice with mounted tops, mine was carelessly done!
Thank you for baking along with us, have a great day!