
I heart cupcakes.
I heart chocolate cupcakes.
I heart chocolate cupcakes that are terribly easy to make.
Chocolate cupcakes that are terribly easy to make help me attain inner peace.
(Sorry, just watched Kungfu Panda 2…)
And this is how I made and devour them:
Step-By-Step Photos

Grab some plain flour, cocoa powder, baking soda, baking powder and salt.

Sift them altogether into a huge bowl.
I really love how soft and fine the mixture looks – no lumps to make me crazy!

Add in some wonderful regular white sugar.

Whisk them together until you attain inner peace…
(Again, it’s the Kungfu Panda 2…)

Crack 2 fresh eggs into a measuring cup, or into another bowl.

Add in some milk…

…some vegetable oil (I used light olive oil because I can’t find the darn vegetable oil)…

…and good old vanilla extract.
Whisk them altogether.

Pour the egg mixture into the flour-cocoa mixture and whisk it up.

Until you get something like this.

And here’s the magic: add in some hot, boiling water into the batter and stir gently.
This makes the batter very liquid and gives you light and fluffy cupcakes. Yum!

Pour the cake batter into the baking tins…

…And bake until well-risen, puffy and fluffy.
I used a cream cheese-butter frosting because I liked the tang in the cream cheese
But of course you can just use an all-butter frosting.
Or let them go naked.
Whichever gives you inner peace.

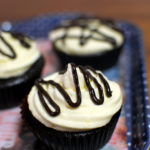
I piped some melted chocolate over the frosting. Looks more decadent and classy?

And they are so, so utterly yummy!
Easy Peasy Chocolate Cupcakes
INGREDIENTS
Cupcakes
- 150 grams all-purpose flour
- 50 grams ocoa powder
- 3/4 teaspoon baking soda
- 1/2 teaspoon baking powder
- 1/4 teaspoon salt
- 120 grams caster sugar
- 2 eggs
- 125 ml vegetable oil
- 1 teaspoon vanilla extract
- 185 ml milk
- 185 ml boiling water
Frosting
- 125 grams cream cheese, at room temperature
- 125 grams unsalted butter, at room temperature
- 200 grams icing sugar, sifted
- 1 teaspoon vanilla extract
- Melted chocolate, optional
INSTRUCTIONS
Cupcakes
- Preheat the oven to 175 degrees Celsius. Line the cupcake trays with cupcake liners and set aside.
- In a huge bowl, sift the all-purpose flour, cocoa powder, baking soda, baking powder and salt together. Add in the caster sugar and use a whisk and whisk everything together. Set aside.
- In a separate bowl, whisk together the eggs, vegetable oil, vanilla extract and milk.
- Add the eggs mixture into the flour mixture and whisk together till they are all combined together. Add in the boiling hot water and mix together gently.
- Pour the cake batter into a measuring cup (because it’s easier to transfer the cake batter later on, but if you hate washing an extra item… you can just scoop using a spoon or ladle, though it’ll be harder to do so). Pour the cake batter into the cupcake liners till 80% full.
- Bake for 15 – 20 minutes until a skewer inserted into the centre of the cake comes out clean.
- Remove the cupcakes from their trays and let them cool completely on a wire rack before frosting them.
Frosting
- Using an electric mixer, beat the cream cheese and unsalted butter together. Gradually add in the icing sugar till the icing sugar is fully incorporated. Beat in the vanilla extract.
- Pipe the frosting onto the cooled cupcakes or spread the frosting on with a spatula. Decorate with some melted chocolate if you’d like and serve! (:
- Store frosted cupcakes in an air-tight container in the fridge and consume within 5 days. Thaw slightly at room temperature before eating!
NOTES
- Use an all-buttercream frosting – simply substitute the cream cheese with equal amounts of unsalted butter.
- There’s not much icing sugar used in the frosting (I’m not a very huge sweet tooth), so the frosting may be a bit soft to handle, given the warm and humid climate of Singapore. To make it easier to pipe the frosting, transfer the frosting into a piping bag and place the piping bag in the fridge for 15 minutes before using. If not, double the amount of icing sugar to be used for the frosting.
- Adapted from Bakerella’s Cookies and Cream Cupcakes
I’m going to submit this recipe to Aspiring Bakers #13: Enjoy Cupcakes! (November 2011) hosted by Min of Min’s Blog.
rekha says
this chocolate cup cake was awesome!!! i loved it
Jasline N. says
Hi Rekha! I’m so glad you love it!!
Baking Scientist says
Thank you for sharing this recipe. I made them yesterday and they were indeed delicious. I love easy and delicious recipe too!
Jasline N. says
You are welcome! I’m glad you like the recipe, I feel like baking some today, shall see if I have the ingredients! 😉
Baking Scientist says
Hello Jasline, by the way, what is the size of the cupcake liners that you used?
Jasline N. says
Hi Baking Scientist, the cupcake liner I used for this recipe is 1 3/4-inch (4.5cm) in base 1-inch (2cm) tall, slightly smaller than those I used usually.
Jasline says
Dear Bobbi, you are welcome! It’s indeed time consuming… I’m still trying to learn more about photoshop to batch watermark the photos, so maybe you can have a look at this video too. (: Have a great day too!
Bam's Kitchen says
Dear Jasline,
Thanks so much for the link. I know it does add so much more time to the process so I guess that is why I have put it off thus far, but I know watermarking my photos is something I should be doing. Have a great day!
Jasline says
Hi Bobbi, I created a custom brush using photoshop. So all I do is just “stamp” the brush onto the photos. I got the tutorial from here. In the past I used to use Paint / Picasa and use the text tool to type in the copyright, but it takes up a lot more time… I hope it helps! (:
Bam's Kitchen says
Thanks Jasline! May I ask what software you use to create the watermark for your pictures? I have a mac computer and am looking for a simple and convenient option. What are your thoughts on this? Take care
Jasline says
Bam: Hi Bobbi, thank you so much! The lemon cake on your blog looks really yummy too! (:
Bam's Kitchen says
Jasline, these cupcakes look divine. So moist and they just come alive with your photography. Beautiful pictures!
Jasline says
Savoury Simple: Thank you very much!
Musketness: Thank you! (: I’m too lazy to get an extra bottle of vegetable oil… because I’ll never be able to finish it. (;
musketnuss says
Oh, I bet those are scrumptious! The melted chocolate on top of the frosting looks great. I always take olive oil because I never have plain vegetable oil at home. I don’t think it makes a big difference in the taste. (For me, it can only get better with olive oil, actually.)
Savory Simple says
I heart cupcakes as well. These are lovely.